 The Google Maps function, formerly known as Google Places, is now part of the Google My Business dashboard – Google’s dashboard for managing and tracking your online presence across Google’s various platforms including Google Local (Google Maps), Google+, Google Analytics and Adwords.
As you’re preparing to set up your listing, just a reminder – although Google will, in some situations, display businesses from surrounding communities in the “Local” search results (Maps), you are only allowed to register your business in the town or city in which you have a physical address.
Adding or Claiming Your Business on Google My Business
If you’re an established business, chances are your business already exists in the Google My Business directory and you’ll just need to claim it. New businesses or new locations will probably have to be added.
1. Go to Google My Business.
- Click “Get on Google”

2. Enter Your Business Name and Address in the Search Box.

3. Select or Add Your Business.
Click on your business listing if it appears among the suggested matches. If not select “Add your Business”, and provide the necessary information.
Recommended for You
Webcast, October 12th: The Subtle Art of Content Marketing as Sales Enablement
TIP: Determine how you want your business Name-Address-Phone Number (NAP) to appear across the web and use that NAP here (i.e. Will you spell out S-t-r-e-e-t, or use St.?) The address that you use here should become your default address across the web. Consistency is important.
 As you answer questions, remember that the more specific and accurate the information Google has about your business, the better it will be able to correctly classify and display your business listing.
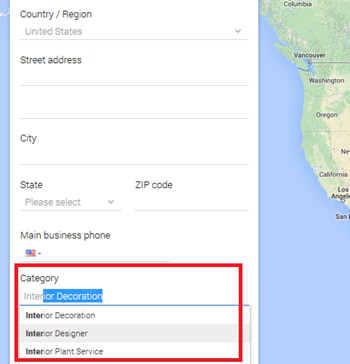
Category Selection
Near the bottom of the form, you will be asked to choose a Category that describes your business.
The category selection is very important as it is essentially the way Google will classify your business, and the type of search query it will display your listing for.
Google has preset Categories, or keywords, for each industry. Start typing your keyword in to see if Google produces a match, then select the best one. You will get a chance to add more categories later on (up to 5).
4. Verify Your Business
Google will want to verify that your business is located where you say that it is. This usually means waiting 1-2 weeks for a postcard with a verification PIN.

Occasionally you’ll be given the option to receive your PIN by text message or or automated phone call – take it – it’s much faster and easier!
image: http://cdn.business2community.com/wp-content/uploads/2014/12/icon_smile1.gif1.gif
![]()
TIP: If you do have to wait on a postcard, remind anyone that handles the mail to be on the lookout for
image: http://cdn.business2community.com/wp-content/uploads/2014/12/google-verification-pin-postcard-200x.jpg.jpg
 it, then try to verify it as soon as you get it (you have 30 days). You’d be surprised how often businesses have to go through the verification process 2 or 3 times because someone threw the postcard away or forgot to use it once they received it.
5. Confirm your Business. Set up a Google+ Page.

Setting up your Google My Business page is the first step in Local Search Optimization, and should be a high priority for all businesses hoping to be found online.
Read more at http://www.business2community.com/social-business/add-business-google-maps-01094521#Mft01ddpEkR90V6G.99